|
While common in military and para-military tactical situations, terrorist attacks, and explosions, and somewhat common in motor vehicle and farm machinery accidents, life-threatening bleeding is rare in a recreational wilderness environment. Chainsaws, ice-climbing tools, tree stubs, motorboat props, etc. can elicit significant injuries. Rescuers should assess all trauma patients for external bleeding that, if not immediately controlled, may rapidly lead to volume shock and death. Most life-threatening bleeding is arterial; however, severe venous bleeding is possible. Hemophiliacs and patients taking anticoagulant medications may be at extreme risk from even small lacerations. Closely examine all trauma patients for significant bleeding. Remove or cut clothing and visually inspect the wound. If necessary, wipe away excess blood. Feel for blood in areas that are difficult to see. Arterial blood is bright red and spurts out of a wound in time with the patient's pulse; in contrast, venous blood is darker and while it does not spurt, blood loss can be heavy. Severe, life-threatening bleeding, while extremely rare in a wilderness setting, must be controlled quickly as death from exsanguination can occur within minutes. The primary tools are well-aimed direct pressure, pressure bandages, commercial tourniquets, and hemostatic dressings; pressure points and elevation are ineffective. Well-aimed direct pressure is first step in controlling severe bleeding and, if successful, often followed by the application of a pressure bandage. Guidelines for Applying Direct Pressure
Guidelines for Applying a Pressure Bandage
 Extremity Tourniquets The successful use of commercial extremity tourniquets by the military over the past decade has saved countless lives. With the proper training, commercial tourniquets—CAT, SOF-TT, SOF-TT wide, and SAM XT—are effective and safe to use in a wilderness environment. Two large military studies conducted in Iraq show respectively a 90% and 96% survival rate when commercial tourniquets were applied before the onset of volume shock, 4% and 10% survival when applied after the onset of volume shock, and 0% survival rate when not applied but needed. These studies clearly indicate that properly applied commercial tourniquets are both safe and effective as a first line treatment for life-threatening bleeding on the extremities. Does this mean that you should carry a commercial tourniquet in your first aid kit while hiking, skiing, paddling, climbing, etc.? Probably not, but it is worthy of consideration. Remember, severe extremity bleeding, while common on a battlefield or in a tactical situation, is extremely rare in an expedition setting. Tourniquets are more likely to be needed when machines—chain saws, chippers, wood splitters, farm machinery, etc.—are used in remote setting or when responding to a serious vehicle accident. Given their relatively small size, lightweight construction, and low cost, it makes sense to carry a commercial tourniquet if you are a member of a paramilitary group (police, warden, ranger, etc.), working with farm or logging equipment, or in your vehicle first aid kit, not so much in your expedition kit. It’s important to note that improvised tourniquets have been shown to be generally ineffective due to the time it takes to locate the necessary supplies and apply it, and the skill required to engineer it. A venous tourniquet—one that shuts down the venous system but not the arterial system—is not effective and can reduce core blood volume and lead to a compartment syndrome. Most rescuers are surprised at the amount of force required to block arterial flow to the extremity. If you think you might need an improvised tourniquet, carry a commercial tourniquet instead. If you choose to carry a commercial tourniquet, you need to practice and master its use before you rely on it in a field situation. Application Guidelines for Commercial Extremity Tourniquets
Once a tourniquet is in place, evaluate it in a controlled situation within two hours. Tourniquets left in place for greater than six hours may cause significant tissue damage. Do not attempt conversion if the patient has an unstable critical system problem, bleeding disorder, or taking Rx blood thinners. Conversion Guidelines for Commercial Extremity Tourniquets
Hemostatic Dressings Hemostatic dressings are used in conjunction with pressure bandages when a tourniquet is unavailable or or inappropriate, as in junctional or truncal bleeding). As with tourniquet use, the first step is to apply direct pressure to the site. While many of the first generation hemostatic agents had problems and are no longer commercially available, third generation dressings have few issues and made with chitosan or kaolin. Dressings made with chitosan—Celox Gauze, ChitoGauze, and ChitoSAM—react with blood to form a localized clot independent of the normal clotting cascade. Dressings made with kaolin—Combat Gauze—activate the intrinsic coagulation pathway. Unlike kaolin, that remains in the body, chitosan is naturally broken down by bodily enzymes and cleared. Since ChitoSAM gauze is made from 100% chitosan (rather than chitosan impregnated gauze) and can be left in the wound longer than other hemostatic dressings, it is more suitable for use in remote settings when evacuation is delayed. Application Guidelines for Hemostatic & Gauze Dressings
If you think a wound is bleeding severely, treat it as if it is and follow the steps outlined in the following algorithm: 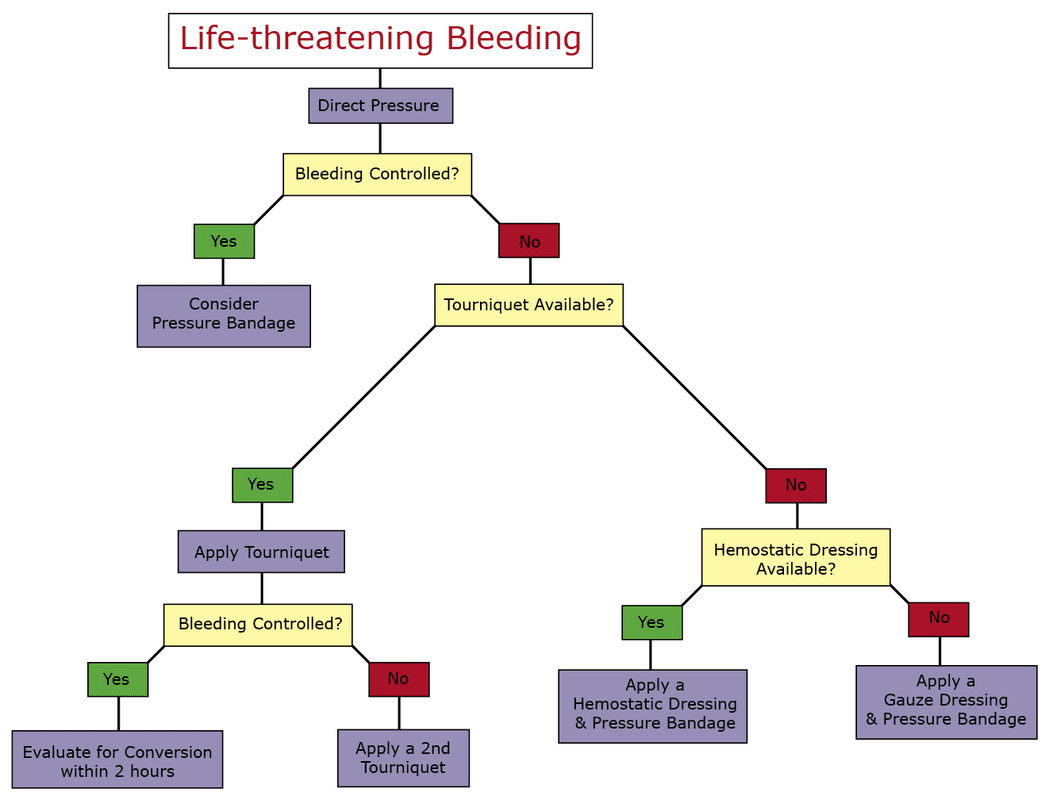 Looking for a reliable field reference? Consider consider purchasing one of our print or digital handbooks; our digital handbook apps are available in English, Spanish, and Japanese. Updates are free for life. A digital SOAP note app is also available.
0 Comments
Your comment will be posted after it is approved.
Leave a Reply. |
Categories
All
Our public YouTube channel has educational and reference videos for many of the skills taught during our courses. Check it out!
|
 RSS Feed